Jak utworzyć kalendarz miesięczny / roczny w programie Excel?
Za jakiś czas musisz utworzyć kalendarz na określony miesiąc lub rok w Excelu, jak szybko go rozwiązać? W tym samouczku przedstawiono sztuczki umożliwiające szybkie tworzenie kalendarza miesięcznego lub rocznego w programie Excel.
Utwórz miesięczny lub roczny kalendarz za pomocą szablonu programu Excel
Stwórz miesięczny kalendarz według VBA
Z łatwością twórz miesięczne lub roczne kalendarze za pomocą Perpetual Calendar ![]()
 Utwórz miesięczny lub roczny kalendarz za pomocą szablonu programu Excel

W programie Excel możesz użyć szablonu kalendarza, aby utworzyć kalendarz miesięczny lub roczny.
1. W programie Excel 2010/2013 kliknij filet > Nowości, w programie Excel 2007 kliknij Przycisk pakietu Office > Nowości, a następnie w prawej części wyskakującego okna wpisz kalendarz do wyszukiwarki. Zobacz zrzut ekranu:
W programie Excel 2010/2013
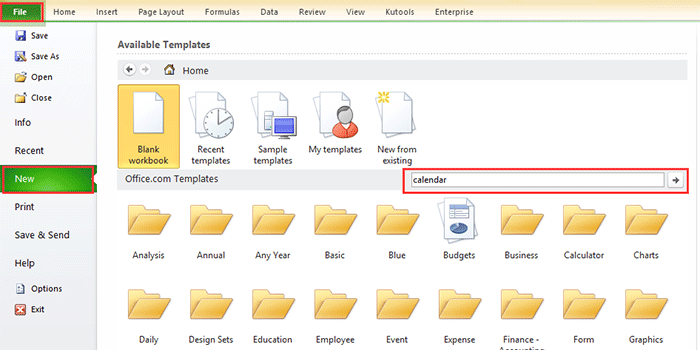
W programie Excel 2007

2. naciśnij Wchodzę, w oknie wyświetla się lista różnych typów kalendarzy. Wybierz jeden typ kalendarza, którego potrzebujesz, i kliknij Pobierz (lub utwórz) w prawym okienku. Zobacz zrzut ekranu:

Teraz kalendarz jest tworzony w nowym skoroszycie. Zobacz zrzut ekranu:

Stwórz miesięczny kalendarz według VBA
Czasami trzeba stworzyć kalendarz miesięczny na określony miesiąc, np. Styczeń 2015. Znalezienie takiego szablonu kalendarza z powyższą metodą może być bardzo trudne. Tutaj przedstawiam kod VBA, który pomoże Ci stworzyć określony kalendarz miesięczny.
1. naciśnij Alt + F11 klucze do otwarcia Microsoft Visual Basic for Applications okno, kliknij wstawka > Moduł, a następnie skopiuj i wklej poniższy kod VBA do okna.
VBA: Utwórz miesięczny kalendarz.
Sub CalendarMaker()

       ' Unprotect sheet if had previous calendar to prevent error.
       ActiveSheet.Protect DrawingObjects:=False, Contents:=False, _
          Scenarios:=False
       ' Prevent screen flashing while drawing calendar.
       Application.ScreenUpdating = False
       ' Set up error trapping.
       On Error GoTo MyErrorTrap
       ' Clear area a1:g14 including any previous calendar.
       Range("a1:g14").Clear
       ' Use InputBox to get desired month and year and set variable
       ' MyInput.
       MyInput = InputBox("Type in Month and year for Calendar ")
       ' Allow user to end macro with Cancel in InputBox.
       If MyInput = "" Then Exit Sub
       ' Get the date value of the beginning of inputted month.
       StartDay = DateValue(MyInput)
       ' Check if valid date but not the first of the month
       ' -- if so, reset StartDay to first day of month.
       If Day(StartDay) <> 1 Then
           StartDay = DateValue(Month(StartDay) & "/1/" & _
               Year(StartDay))
       End If
       ' Prepare cell for Month and Year as fully spelled out.
       Range("a1").NumberFormat = "mmmm yyyy"
       ' Center the Month and Year label across a1:g1 with appropriate
       ' size, height and bolding.
       With Range("a1:g1")
           .HorizontalAlignment = xlCenterAcrossSelection
           .VerticalAlignment = xlCenter
           .Font.Size = 18
           .Font.Bold = True
           .RowHeight = 35
       End With
       ' Prepare a2:g2 for day of week labels with centering, size,
       ' height and bolding.
       With Range("a2:g2")
           .ColumnWidth = 11
           .VerticalAlignment = xlCenter
           .HorizontalAlignment = xlCenter
           .VerticalAlignment = xlCenter
           .Orientation = xlHorizontal
           .Font.Size = 12
           .Font.Bold = True
           .RowHeight = 20
       End With
       ' Put days of week in a2:g2.
       Range("a2") = "Sunday"
       Range("b2") = "Monday"
       Range("c2") = "Tuesday"
       Range("d2") = "Wednesday"
       Range("e2") = "Thursday"
       Range("f2") = "Friday"
       Range("g2") = "Saturday"
       ' Prepare a3:g7 for dates with left/top alignment, size, height
       ' and bolding.
       With Range("a3:g8")
           .HorizontalAlignment = xlRight
           .VerticalAlignment = xlTop
           .Font.Size = 18
           .Font.Bold = True
           .RowHeight = 21
       End With
       ' Put inputted month and year fully spelling out into "a1".
       Range("a1").Value = Application.Text(MyInput, "mmmm yyyy")
       ' Set variable and get which day of the week the month starts.
       DayofWeek = WeekDay(StartDay)
       ' Set variables to identify the year and month as separate
       ' variables.
       CurYear = Year(StartDay)
       CurMonth = Month(StartDay)
       ' Set variable and calculate the first day of the next month.
       FinalDay = DateSerial(CurYear, CurMonth + 1, 1)
       ' Place a "1" in cell position of the first day of the chosen
       ' month based on DayofWeek.
       Select Case DayofWeek
           Case 1
               Range("a3").Value = 1
           Case 2
               Range("b3").Value = 1
           Case 3
               Range("c3").Value = 1
           Case 4
               Range("d3").Value = 1
           Case 5
               Range("e3").Value = 1
           Case 6
               Range("f3").Value = 1
           Case 7
               Range("g3").Value = 1
       End Select
       ' Loop through range a3:g8 incrementing each cell after the "1"
       ' cell.
       For Each cell In Range("a3:g8")
           RowCell = cell.Row
           ColCell = cell.Column
           ' Do if "1" is in first column.
           If cell.Column = 1 And cell.Row = 3 Then
           ' Do if current cell is not in 1st column.
           ElseIf cell.Column <> 1 Then
               If cell.Offset(0, -1).Value >= 1 Then
                   cell.Value = cell.Offset(0, -1).Value + 1
                   ' Stop when the last day of the month has been
                   ' entered.
                   If cell.Value > (FinalDay - StartDay) Then
                       cell.Value = ""
                       ' Exit loop when calendar has correct number of
                       ' days shown.
                       Exit For
                   End If
               End If
           ' Do only if current cell is not in Row 3 and is in Column 1.
           ElseIf cell.Row > 3 And cell.Column = 1 Then
               cell.Value = cell.Offset(-1, 6).Value + 1
               ' Stop when the last day of the month has been entered.
               If cell.Value > (FinalDay - StartDay) Then
                   cell.Value = ""
                   ' Exit loop when calendar has correct number of days
                   ' shown.
                   Exit For
               End If
           End If
       Next

       ' Create Entry cells, format them centered, wrap text, and border
       ' around days.
       For x = 0 To 5
           Range("A4").Offset(x * 2, 0).EntireRow.Insert
           With Range("A4:G4").Offset(x * 2, 0)
               .RowHeight = 65
               .HorizontalAlignment = xlCenter
               .VerticalAlignment = xlTop
               .WrapText = True
               .Font.Size = 10
               .Font.Bold = False
               ' Unlock these cells to be able to enter text later after
               ' sheet is protected.
               .Locked = False
           End With
           ' Put border around the block of dates.
           With Range("A3").Offset(x * 2, 0).Resize(2, _
           7).Borders(xlLeft)
               .Weight = xlThick
               .ColorIndex = xlAutomatic
           End With

           With Range("A3").Offset(x * 2, 0).Resize(2, _
           7).Borders(xlRight)
               .Weight = xlThick
               .ColorIndex = xlAutomatic
           End With
           Range("A3").Offset(x * 2, 0).Resize(2, 7).BorderAround _
              Weight:=xlThick, ColorIndex:=xlAutomatic
       Next
       If Range("A13").Value = "" Then Range("A13").Offset(0, 0) _
          .Resize(2, 8).EntireRow.Delete
       ' Turn off gridlines.
       ActiveWindow.DisplayGridlines = False
       ' Protect sheet to prevent overwriting the dates.
       ActiveSheet.Protect DrawingObjects:=True, Contents:=True, _
          Scenarios:=True

       ' Resize window to show all of calendar (may have to be adjusted
       ' for video configuration).
       ActiveWindow.WindowState = xlMaximized
       ActiveWindow.ScrollRow = 1

       ' Allow screen to redraw with calendar showing.
       Application.ScreenUpdating = True
       ' Prevent going to error trap unless error found by exiting Sub
       ' here.
       Exit Sub
   ' Error causes msgbox to indicate the problem, provides new input box,
   ' and resumes at the line that caused the error.
   MyErrorTrap:
       MsgBox "You may not have entered your Month and Year correctly." _
           & Chr(13) & "Spell the Month correctly" _
           & " (or use 3 letter abbreviation)" _
           & Chr(13) & "and 4 digits for the Year"
       MyInput = InputBox("Type in Month and year for Calendar")
       If MyInput = "" Then Exit Sub
       Resume
   End Sub
VBA pochodzi z tej sieci https://support.microsoft.com/en-us/kb/150774
2. naciśnij F5 klucz lub run i pojawi się okno dialogowe przypominające o wpisaniu konkretnego miesiąca, w którym chcesz utworzyć kalendarz, zobacz zrzut ekranu:

3. kliknij OK. Teraz kalendarz na styczeń 2015 jest tworzony w aktywnym arkuszu.

Ale w powyższych metodach istnieją pewne ograniczenia, na przykład jeśli chcesz utworzyć kalendarz od stycznia do maja od razu, musisz utworzyć kalendarz pięć razy za pomocą powyższych dwóch metod. Teraz przedstawiam przydatne narzędzie do szybkiego i łatwego rozwiązania tego problemu
Z łatwością twórz miesięczne lub roczne kalendarze za pomocą Perpetual Calendar
Perpetual Calendar jest jednym z potężnych narzędzi w programie Kutools dla programu Exceli może pomóc szybko utworzyć kalendarz miesięczny lub roczny w programie Excel jednocześnie.
| Kutools dla programu Excel, ponad 300 przydatne funkcje, ułatwiają pracę. | ||
1. kliknij Enterprise > Ćwiczenie > Perpetual Calendar. zobacz zrzut ekranu:

2. W wyświetlanym oknie dialogowym określ miesiąc, w którym chcesz utworzyć kalendarz, i kliknij Stwórz. Zobacz zrzut ekranu:

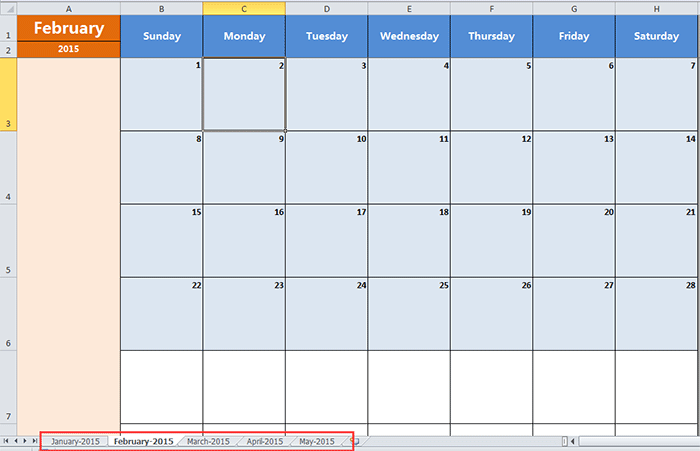
Następnie tworzony jest nowy skoroszyt z pięcioma arkuszami kalendarza. Zobacz zrzut ekranu:
Wskazówka:
Jeśli chcesz tylko utworzyć kalendarz określonego miesiąca, wystarczy wybrać ten sam miesiąc zarówno w polach tekstowych Od, jak i Do w oknie dialogowym.
Kliknij tutaj, aby dowiedzieć się więcej o wiecznym kalendarzu
Najlepsze narzędzia biurowe
Zwiększ swoje umiejętności Excela dzięki Kutools for Excel i doświadcz wydajności jak nigdy dotąd. Kutools dla programu Excel oferuje ponad 300 zaawansowanych funkcji zwiększających produktywność i oszczędzających czas. Kliknij tutaj, aby uzyskać funkcję, której najbardziej potrzebujesz...
")
Karta Office wprowadza interfejs z zakładkami do pakietu Office i znacznie ułatwia pracę
- Włącz edycję i czytanie na kartach w programach Word, Excel, PowerPoint, Publisher, Access, Visio i Project.
- Otwieraj i twórz wiele dokumentów w nowych kartach tego samego okna, a nie w nowych oknach.
- Zwiększa produktywność o 50% i redukuje setki kliknięć myszką każdego dnia!
")