Jak automatycznie drukować załączniki po nadejściu wiadomości e-mail w programie Outlook?
W tym samouczku przedstawiono metodę łączenia skryptu VBA i reguły programu Outlook, aby pomóc w automatycznym drukowaniu załączników niektórych wiadomości e-mail po ich przybyciu do programu Outlook.
Automatycznie drukuj załączniki po otrzymaniu określonych wiadomości e-mail
Przypuśćmy, że chcesz automatycznie drukować załączniki przychodzących wiadomości e-mail od określonego nadawcy. Aby to zrobić, możesz wykonać następujące czynności.
Krok 1: Utwórz skrypt w Outlooku
Po pierwsze, musisz utworzyć skrypt VBA w Outlooku.
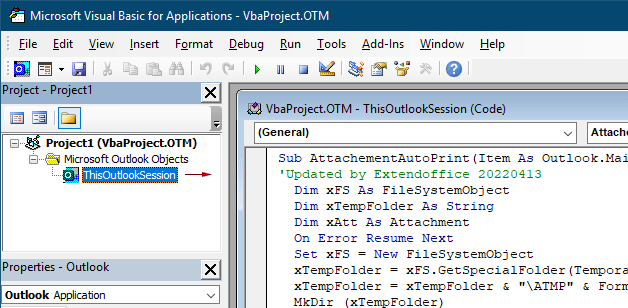
1. Uruchom program Outlook, naciśnij inny + F11 klawisze jednocześnie, aby otworzyć Microsoft Visual Basic for Applications okno.
2. w Microsoft Visual Basic for Applications okno, kliknij dwukrotnie Project1 > Obiekty programu Microsoft Outlook > Ta sesja programu Outlook otworzyć ThisOutlookSession (kod) okno, a następnie skopiuj następujący kod do tego okna kodu.
Kod VBA 1: Automatycznie drukuj załączniki (wszystkie rodzaje załączników) po nadejściu wiadomości e-mail
Sub AttachementAutoPrint(Item As Outlook.MailItem)
'Updated by Extendoffice 20230223
  Dim xFS As FileSystemObject
  Dim xTempFolder As String
  Dim xAtt As Attachment
  Dim xShell As Object
  Dim xFolder As Object, xFolderItem As Object
  Dim xFileName As String
  On Error GoTo xError
  If Item.Attachments.Count = 0 Then Exit Sub
  Set xFS = New FileSystemObject
  xTempFolder = xFS.GetSpecialFolder(TemporaryFolder)
  xTempFolder = xTempFolder & "\ATMP" & Format(Item.ReceivedTime, "yyyymmddhhmmss")
  If Not xFS.FolderExists(xTempFolder) Then
    MkDir (xTempFolder)
  End If
  Set xShell = CreateObject("Shell.Application")
  Set xFolder = xShell.NameSpace(0)
  For Each xAtt In Item.Attachments
    If IsEmbeddedAttachment(xAtt) = False Then
      xFileName = xTempFolder & "\" & xAtt.FileName
      xAtt.SaveAsFile (xFileName)
      Set xFolderItem = xFolder.ParseName(xFileName)
      xFolderItem.InvokeVerbEx ("print")
    End If
  Next xAtt
  Set xFS = Nothing
  Set xFolder = Nothing
  Set xFolderItem = Nothing
  Set xShell = Nothing
xError:
  If Err <> 0 Then
    MsgBox Err.Number & " - " & Err.Description, , "Kutools for Outlook"
    Err.Clear
  End If
Exit Sub
End Sub

Function IsEmbeddedAttachment(Attach As Attachment)
Dim xItem As MailItem
Dim xCid As String
Dim xID As String
Dim xHtml As String
On Error Resume Next
IsEmbeddedAttachment = False
Set xItem = Attach.Parent
If xItem.BodyFormat <> olFormatHTML Then Exit Function
xCid = ""
xCid = Attach.PropertyAccessor.GetProperty("http://schemas.microsoft.com/mapi/proptag/0x3712001F")
If xCid <> "" Then
    xHtml = xItem.HTMLBody
    xID = "cid:" & xCid
    If InStr(xHtml, xID) > 0 Then
        IsEmbeddedAttachment = True
    End If
End If
End Function
Uwaga: Ten kod obsługuje drukowanie wszystkich typów załączników otrzymywanych w wiadomościach e-mail. Jeśli chcesz wydrukować tylko określony typ załącznika, taki jak pliki pdf, zastosuj następujący kod VBA.
Kod VBA 2: Automatycznie drukuj określony typ załączników po nadejściu wiadomości e-mail
Sub AttachementAutoPrint(Item As Outlook.MailItem)
'Updated by Extendoffice 20230223
  Dim xFS As FileSystemObject
  Dim xTempFolder As String
  Dim xAtt As Attachment
  Dim xShell As Object
  Dim xFolder As Object, xFolderItem As Object
  Dim xFileType As String, xFileName As String
  On Error GoTo xError
  If Item.Attachments.Count = 0 Then Exit Sub
  Set xFS = New FileSystemObject
  xTempFolder = xFS.GetSpecialFolder(TemporaryFolder)
  xTempFolder = xTempFolder & "\ATMP" & Format(Item.ReceivedTime, "yyyymmddhhmmss")
  If Not xFS.FolderExists(xTempFolder) Then
    MkDir (xTempFolder)
  End If
  Set xShell = CreateObject("Shell.Application")
  Set xFolder = xShell.NameSpace(0)
  For Each xAtt In Item.Attachments
    If IsEmbeddedAttachment(xAtt) = False Then
      xFileName = xAtt.FileName
      xFileType = LCase$(Right$(xFileName, VBA.Len(xFileName) - VBA.InStrRev(xFileName, ".")))
      xFileName = xTempFolder & "\" & xFileName
      Select Case xFileType
        Case "pdf"   'change "pdf" to the file extension you want to print
          xAtt.SaveAsFile (xFileName)
          Set xFolderItem = xFolder.ParseName(xFileName)
          xFolderItem.InvokeVerbEx ("print")
      End Select
    End If
  Next xAtt
  Set xFS = Nothing
  Set xFolder = Nothing
  Set xFolderItem = Nothing
  Set xShell = Nothing
xError:
  If Err <> 0 Then
    MsgBox Err.Number & " - " & Err.Description, , "Kutools for Outlook"
    Err.Clear
  End If
  Exit Sub
End Sub

Function IsEmbeddedAttachment(Attach As Attachment)
Dim xItem As MailItem
Dim xCid As String
Dim xID As String
Dim xHtml As String
On Error Resume Next
IsEmbeddedAttachment = False
Set xItem = Attach.Parent
If xItem.BodyFormat <> olFormatHTML Then Exit Function
xCid = ""
xCid = Attach.PropertyAccessor.GetProperty("http://schemas.microsoft.com/mapi/proptag/0x3712001F")
If xCid <> "" Then
    xHtml = xItem.HTMLBody
    xID = "cid:" & xCid
    If InStr(xHtml, xID) > 0 Then
        IsEmbeddedAttachment = True
    End If
End If
End Function
Uwagi:
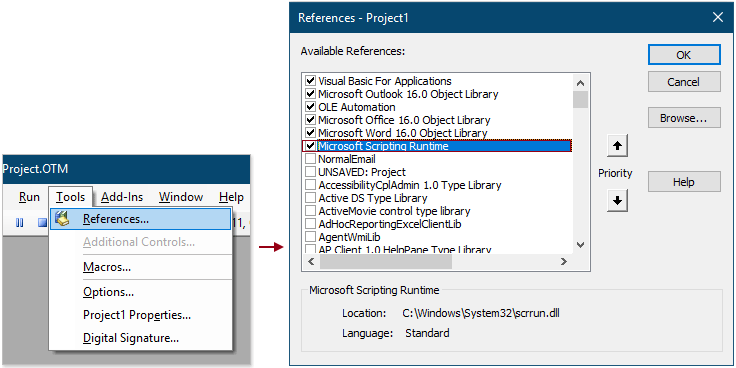
3. Śmiało i kliknij Tools > Referencje. W wyskakującym okienku Referencje – Projekt1 w oknie dialogowym, sprawdź Środowisko wykonawcze skryptów firmy Microsoft Microsoft a następnie kliknij OK przycisk.
4. Zapisz kod i naciśnij inny + Q klucze do zamknięcia Microsoft Visual Basic for Applications okno.
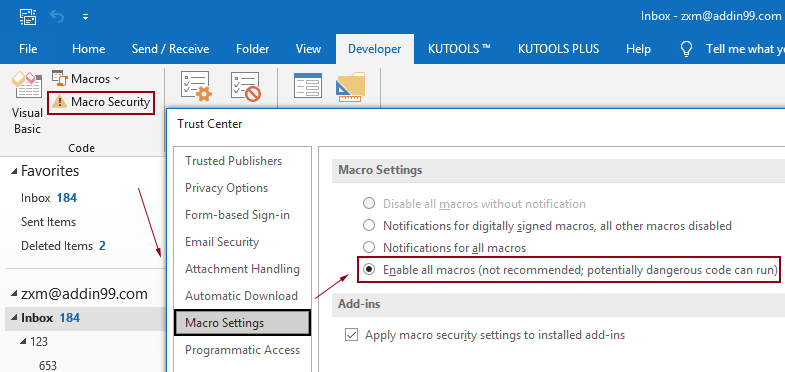
Uwaga: Upewnij się, że Włącz wszystkie makra opcja jest włączona w Twoim Outlooku. Możesz sprawdzić tę opcję, wykonując czynności przedstawione poniżej.
Krok 2: Zbuduj regułę do korzystania ze skryptu
Po dodaniu skryptu VBA w Outlooku musisz utworzyć regułę, aby używać skryptu na podstawie określonych warunków.
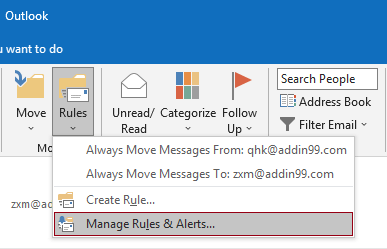
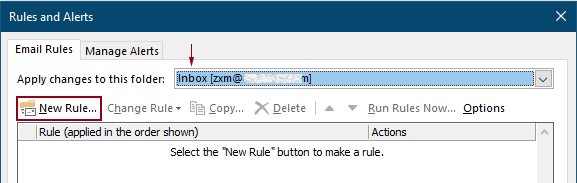
1. Przejdź do zakładki Strona główna, kliknij Zasady > Zarządzaj regułami i alertami.
2. w Reguły i alerty okno dialogowe, kliknij przycisk Nowa zasada przycisk, aby utworzyć regułę.
Porady: Jeśli dodałeś wiele kont e-mail do swojego Outlooka, określ konto w Zastosuj zmiany w tym folderze listę rozwijaną, w której chcesz zastosować regułę. W przeciwnym razie zostanie zastosowany do skrzynki odbiorczej aktualnie wybranego konta e-mail.
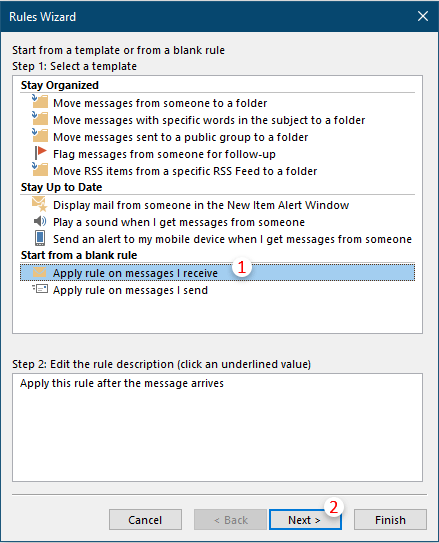
3. W pierwszym Kreator reguł okno dialogowe, wybierz Zastosuj regułę do otrzymywanych wiadomości Krok 1 , a następnie kliknij Dalej.
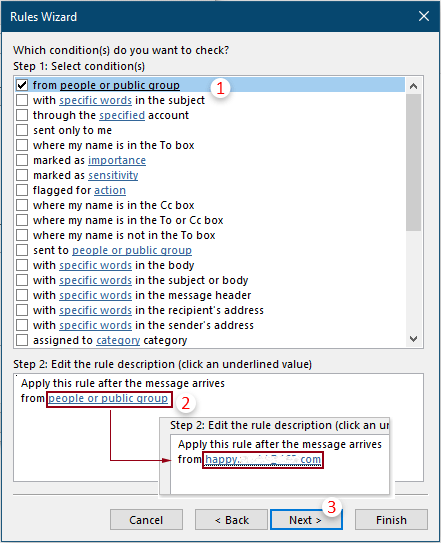
4. W sekundę Kreator reguł w oknie dialogowym, musisz:
5. W trzecim Kreator reguł W oknie dialogowym należy skonfigurować w następujący sposób.
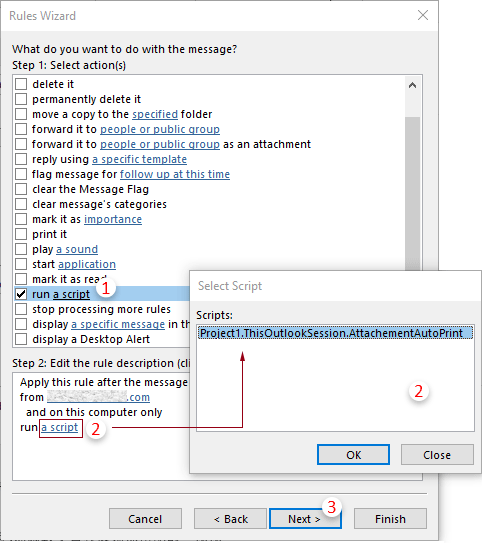
Porady: Jeśli "uruchom skrypt” brakuje opcji w twoim Kreator reguł, możesz go wyświetlić, postępując zgodnie z metodą opisaną w tym artykule: przywrócić brakującą opcję Uruchom skrypt w regule programu Outlook.
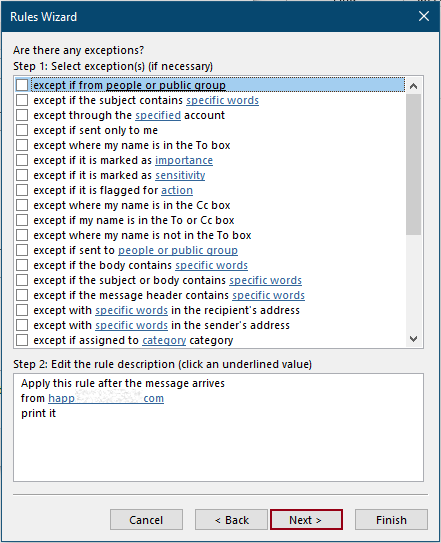
6. Potem kolejny Kreator reguł wyskakuje pytanie o wyjątki. W razie potrzeby możesz wybrać wyjątki, w przeciwnym razie kliknij Następna przycisk bez żadnych wyborów。
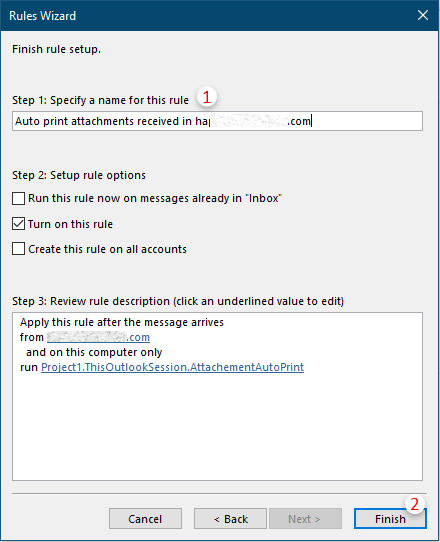
7. W ostatnim Kreator reguł, musisz podać nazwę reguły, a następnie kliknąć koniec przycisk.
8. Następnie wraca do Reguły i alerty w oknie dialogowym, możesz zobaczyć utworzoną regułę wymienioną w środku, kliknij OK aby zakończyć wszystkie ustawienia.
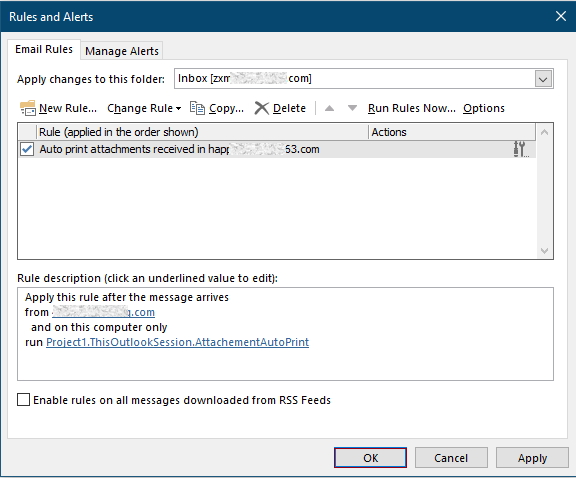
Od tej chwili, po otrzymaniu wiadomości e-mail od określonej osoby, załączone pliki zostaną wydrukowane automatycznie.
Powiązane artykuły
Drukuj tylko załączniki z jednego e-maila lub wybranych wiadomości e-mail w programie Outlook
W Outlooku możesz drukować wiadomości e-mail, ale czy wydrukowałeś załączniki tylko z jednego e-maila lub wybranych wiadomości e-mail w Outlooku? Ten artykuł przedstawia triki dotyczące rozwiązania tego zadania.
Drukuj tylko nagłówek wiadomości e-mail w programie Outlook
Podczas drukowania wiadomości e-mail w programie Outlook wydrukuje zarówno nagłówek wiadomości, jak i treść wiadomości w wiadomości e-mail. Jednak w niektórych szczególnych przypadkach może być konieczne wydrukowanie nagłówka wiadomości z tematem, nadawcą, odbiorcami itp. W tym artykule przedstawimy dwa rozwiązania, aby to zrobić.
Wydrukuj kalendarz w określonym/niestandardowym zakresie dat w programie Outlook
Zwykle podczas drukowania kalendarza w widoku miesiąca w Outlooku automatycznie wybierze miesiąc zawierający aktualnie wybraną datę. Ale może być konieczne wydrukowanie kalendarza w niestandardowym zakresie dat, takim jak 3 miesiące, pół roku itp. W tym artykule przedstawimy rozwiązanie dla Ciebie.
Wydrukuj kontakt ze zdjęciem w programie Outlook
Zwykle zdjęcie kontaktu nie zostanie wydrukowane podczas drukowania kontaktu w programie Outlook. Ale czasami wydrukowanie kontaktu z jego zdjęciem będzie bardziej imponujące. W tym artykule przedstawimy kilka obejść, aby to zrobić.
Wydrukuj wybrane wiadomości e-mail w programie Outlook
Jeśli otrzymałeś wiadomość e-mail i okazało się, że część treści wiadomości e-mail musi zostać wydrukowana zamiast drukować całą wiadomość, co byś zrobił? W rzeczywistości program Outlook może pomóc w wykonaniu tej operacji za pomocą przeglądarek internetowych, takich jak Firefox i Internet Explorer. W tym miejscu wezmę na przykład przeglądarki internetowe. Proszę spojrzeć na poniższe samouczki.
Więcej artykułów na temat „drukowania w programie Outlook”...
Najlepsze narzędzia biurowe
Kutools dla programu Outlook - Ponad 100 zaawansowanych funkcji, które usprawnią Twoje perspektywy
🤖 Asystent poczty AI: Natychmiastowe profesjonalne e-maile z magią AI — genialne odpowiedzi jednym kliknięciem, doskonały ton, biegła znajomość wielu języków. Zmień e-mailing bez wysiłku! ...
📧 Automatyzacja poczty e-mail: Poza biurem (dostępne dla POP i IMAP) / Zaplanuj wysyłanie wiadomości e-mail / Automatyczne CC/BCC według reguł podczas wysyłania wiadomości e-mail / Automatyczne przewijanie (Zasady zaawansowane) / Automatyczne dodawanie powitania / Automatycznie dziel wiadomości e-mail od wielu odbiorców na pojedyncze wiadomości ...
📨 Zarządzanie e-mail: Łatwe przywoływanie e-maili / Blokuj oszukańcze wiadomości e-mail według tematów i innych / Usuń zduplikowane wiadomości e-mail / Wiecej opcji / Konsoliduj foldery ...
📁 Załączniki Pro: Zapisz zbiorczo / Odłącz partię / Kompresuj wsadowo / Automatyczne zapisywanie / Automatyczne odłączanie / Automatyczna kompresja ...
🌟 Magia interfejsu: 😊Więcej ładnych i fajnych emotikonów / Zwiększ produktywność programu Outlook dzięki widokom na kartach / Zminimalizuj program Outlook zamiast go zamykać ...
>> Cuda jednym kliknięciem: Odpowiedz wszystkim, dodając przychodzące załączniki / E-maile chroniące przed phishingiem / 🕘Pokaż strefę czasową nadawcy ...
👩🏼🤝👩🏻 Kontakty i kalendarz: Grupowe dodawanie kontaktów z wybranych e-maili / Podziel grupę kontaktów na pojedyncze grupy / Usuń przypomnienia o urodzinach ...
O Cechy 100 Poczekaj na eksplorację! Kliknij tutaj, aby dowiedzieć się więcej.

